Today's post is very special. It's written in collaboration with Axel de Romblay the author of the MLBox Auto-ML package that has gained a lot of popularity these last years.
If you haven't heard about this library, go and check it out on github: It encompasses interesting features, it's gaining in maturity and is now under active development.

In this post, we'll show you how you can easily use it to train an automated machine learning pipeline for a classification problem. It'll start off by loading and cleaning the data, removing drift, launching a strong pipeline of accelerated optimization and generating predictions.
0 - Introduction to Auto-ML
MLBox has been presented to many machine learning Meetups. You can check one of the slides here. It's a good start to have an overview of the library of more generally of the AutoML concept.
1 - Downloading the train and test datasets
For the purpose of this notebook, we'll be solving the famous Titanic Kaggle challenge which consists in predicting the survival of passengers based on their attributes (Sex, Age, Name, etc).
If you're not familiar with this competition you can check this article.
Let's now download the data:
From Kaggle if you have an account
If you have a Kaggle account you can generate an API token right here on your profile page:
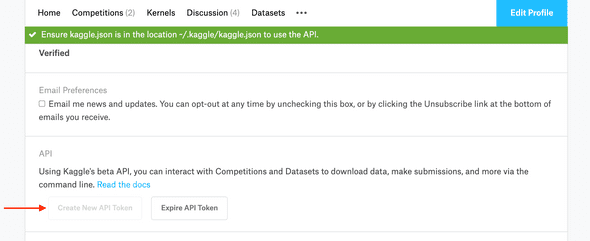
Once the API token is generated, you'll have a kaggle.json downloaded on your system that contains your usename and key.
- If you're on Unix-based OS, place this file in: ~/.kaggle/ and then
chmod 600 ~/.kaggle/kaggle.json- If you're on a Windows machine:
export KAGGLE_USERNAME=<your-username>
export KAGGLE_KEY=<your-key>
From the internet:
Make sure you have wget installed: pip install wget
import wget

train_url = 'https://storage.googleapis.com/kaggle-competitions-data/kaggle/3136/train.csv?GoogleAccessId=web-data@kaggle-161607.iam.gserviceaccount.com&Expires=1570183347&Signature=O7hakdmzfjCnK6so6Yj%2B4TEscq4YD9smNLasKOcBK4k2A737DH3gwcDU5LMZwLH20rjrhrk5vKueJh5EDM8IX5X0l0rDZ4f%2BosbFU%2FHig5s5MetsPMYDqEZyYRq6BRWd4kazaeHnoEjiDnvmHf2a0eQ9%2FC7A9TX72MwVi50MFyD%2F3MXjE7NX0ciXMc1RQVV5fpr5u1qJ98yBaJZS1CWWyXx5D1Q3U5VfvcIPGds%2B3XIYko9MIbd4wnk2g4K3rJijAyTnjoi1sVhyyms0buyxXNQH4eQ3OdUW6EbB1NzHv9F93ZTMUKoY76hAlKNdpFCE%2FpD8YW22hfHEiifUhipmtA%3D%3D'
train_file = wget.download(train_url)

test_url = 'https://storage.googleapis.com/kaggle-competitions-data/kaggle/3136/test.csv?GoogleAccessId=web-data@kaggle-161607.iam.gserviceaccount.com&Expires=1570183224&Signature=ppvKN7j%2BdPC5z5G4HARm%2FaLpkBIfF%2F1%2BbFR9Zwcy81aY%2FTPtoKS8ZZDa2RzmcFfa2C4nm7FGLM%2B70cl742KUjWTDXqEWSyYdvIXabP82LRXJ6UGKGixmoGLcAaNhKT%2FCQrmYmhcrrUoy%2BFj6Ik%2BHtg9vWKaAG6zZAGP3l1uCRQSMrThKBkV6nO1cpeJ%2F8JoeB2DBNdjL%2FnoT7kj2LS2U1pyZjhD3HeIwpBCkbZ6Cdt%2BrXT10YYkrc7tk%2BWHIsIwINg4oC681YGwL99N0IQAkNbxffx4cU7tWwZAHZ6JIdJzohsN8b6QifAMnV5oqc21ad32I5LAz5g9p9PlSgLCzmw%3D%3D'
test_file = wget.download(test_url)
Then place train.csv and test.csv in data folder at the root of the project.
2 - Environment setup and installing MLBox from PyPI
Creating a conda virtual environment is recommended because MLBox encompasses several dependencies that might mess with your current libraries. Having a clean virtual environment is the right solution and if anything goes wrong you can remove it without impacting your system.
You can create it using conda or pyenv. I'm a conda user so I'll use conda.
conda create -n automl python=3.7This creates an environment named automl that has python 3.7 preconfigured on it.
If you're on OSX like me, you'll have to install OpenMP (Open Multi-Processing), an efficient implementation of multithreading, via brew:
(base) brew install libompNow activate automl and install MLBox directly from PyPI:
(base) source activate automl
(automl) pip install mlbox
As you see, mlbox has quite a lot of dependencies such as scikit-learn, pandas, etc. That's why we created an empty virtual environment.
[Optional] : accessing the automl kernel from Jupyter.
If you'd like to use jupyter notebook on this environment without activating it but by selecting the kernel only from the base jupyter dropdown list; you'll have to install ipykernel:
(automl) conda install ipykernel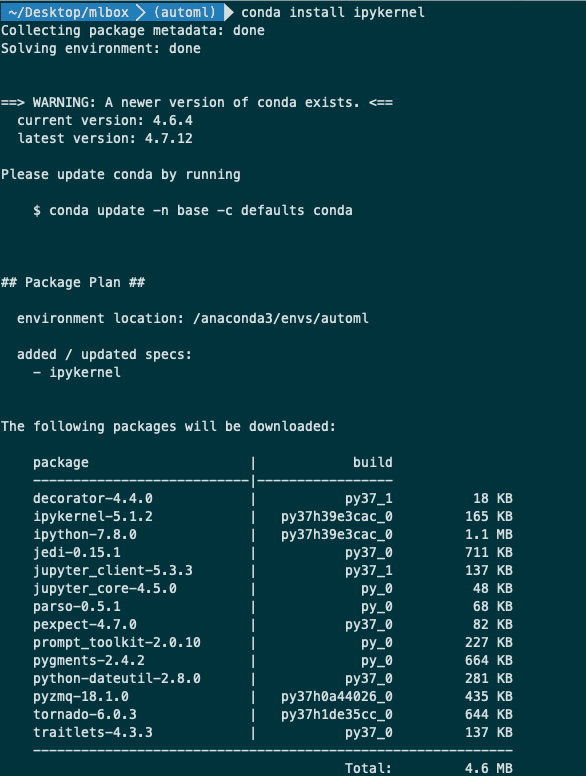
Now you're good to go!
3 - Testing MLBox: from data ingestion to model building
Now we're going to test and run MLBox to quickly build a model to solve the Kaggle Titanic Challenge.
For more information about the documentation of the package and the API you can visit the following links:
- The official repository: https://github.com/AxeldeRomblay/MLBox
- The official documentation: https://mlbox.readthedocs.io/en/latest/
Importing MLBox
%%time

from IPython.core.display import display, HTML
display(HTML('<style>.prompt{width: 0px; min-width: 0px; visibility: collapse}</style>'))

import warnings
warnings.filterwarnings("ignore")

from mlbox.preprocessing.reader import Reader
from mlbox.preprocessing.drift_thresholder import Drift_thresholder
from mlbox.optimisation.optimiser import Optimiser
from mlbox.prediction.predictor import Predictor
Using TensorFlow backend.
CPU times: user 2.42 s, sys: 740 ms, total: 3.16 s
Wall time: 4.04 sInputs to MLBox
If you're having a train and a test set like in any Kaggle competition, you can feed these two paths directly to MLBox as well as the target name.
Otherwise, if fed a train set only, MLBox creates a test set.
paths = ["./data/train.csv", "./data/test.csv"]
target_name = "Survived"
Reading and preprocessing
The Reader class of MLBox is in charge of preparing the data.
It basically provides methods and utilities to:
- Read in the data with the correct separator (csv, xls, json, and h5) and load it
-
Clean the data by:
- deleting Unnamed columns
- inferring column types (float, int, list)
- processing dates and extracting relevant information from it: year, month, day, dayofweek, hour, etc.
- removing duplicates
- Prepare train and test splits
More information here: https://mlbox.readthedocs.io/en/latest/features.html#mlbox.preprocessing.Reader
rd = Reader(sep=",")
df = rd.train_test_split(paths, target_name)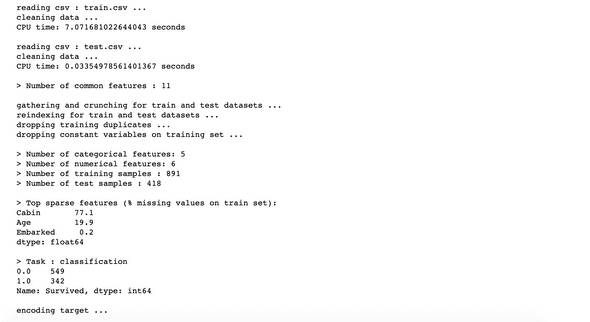
When this function is done running, it creates a folder named save where it dumps the target encoder for later use.
df["train"].head()
Removing drift
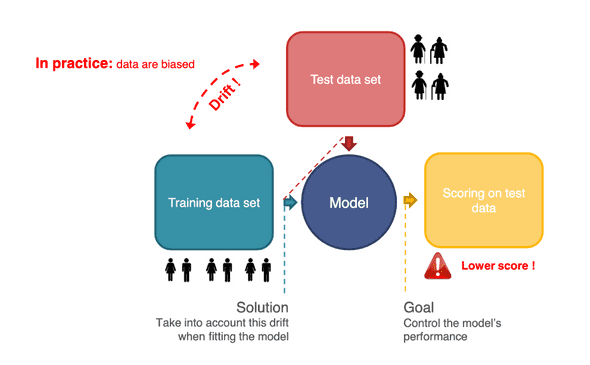
This is an innovative feature I haven't encountered in other packages. The main idea is to automatically detect and remove variables that have a distribution that is substantially different between the train and the test set.
This happens quite a lot and we generally talk about biased data. You could have for example a situation when the train set has a population of young people whereas the test has elderly only. This indicates that the age feature is not robust and may lead to a poor performance of the model when testing. So it has to be discarded.
More information:
- about the algorithm: https://github.com/AxeldeRomblay/MLBox/blob/master/docs/webinars/features.pdf
- about MLBox implementation: https://mlbox.readthedocs.io/en/latest/features.html#mlbox.preprocessing.Drift_thresholder
How does MLBox compute drifts for individual variables
MLBox builds a classifier that separates train from test data. It then uses the ROC score related to this classifier as a measure of the drift.
This makes sense:
- If the drift score is high (i.e. the ROC score is high) the ability the discern train data from test data is easy, which means that the two distributions are very different.
- Otherwise, if the drift score is low (i.e. the ROC score is low) the classifier is not able to separate the two disctributions correctly.
MLBox provides a class called Drift_thresholder that takes as input the train and test sets as well as the target and computes a drift score of each one of the variables.
Drift_thresholder then deletes the variables that have a drift score higher that a threshold (default to 0.6).
dft = Drift_thresholder()
df = dft.fit_transform(df)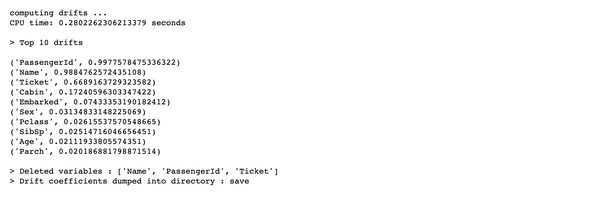
As you see here, Name, PassengerId and Ticket get removed beacause of their respective drift scores. If you think about it, this is not surprising at all because these variables, given their nature, can have any random value thus resulting in plausible drift between their train and test distributions.
The heavy lifting : optimizing
This section performs the optimisation of the pipeline and tries different configurations of the parameters:
- NA encoder (missing values encoder)
- CA encoder (categorical features encoder)
- Feature selector (OPTIONAL)
- Stacking estimator - feature engineer (OPTIONAL)
- Estimator (classifier or regressor)
More details here: https://mlbox.readthedocs.io/en/latest/features.html#mlbox.optimisation.Optimiser
We first instantiate the Optimiser class:
opt = Optimiser()Then we can run it using the default model configuration set as default (LightGBM) without any autoML or complex grid search.
This should be the first baseline
warnings.filterwarnings('ignore', category=DeprecationWarning)
score = opt.evaluate(None, df)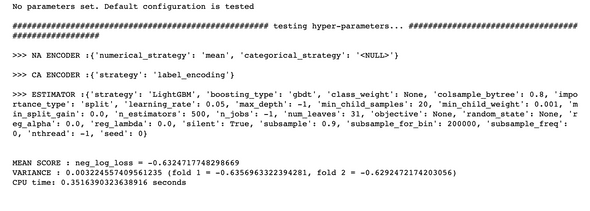
The neglogloss = -0.6325 as a first baseline.
Let's now define a space of multiple configurations:
- ne_numericalstrategy: how to handle missing data in numerical features
- ce__strategy: how to handle categorical variables encoding
- fs: feature selection
- stck: meta-features stacker
- est: final estimator
space = {
        'ne__numerical_strategy':{"search":"choice",
                                 "space":[0, "mean"]},
        'ce__strategy':{"search":"choice",
                        "space":["label_encoding", "random_projection", "entity_embedding"]},
        'fs__threshold':{"search":"uniform",
                        "space":[0.001, 0.2]},
        'est__strategy':{"search":"choice",
                         "space":["RandomForest", "ExtraTrees", "LightGBM"]},
        'est__max_depth':{"search":"choice",
                          "space":[8, 9, 10, 11, 12, 13]}
        }

params = opt.optimise(space, df, 15)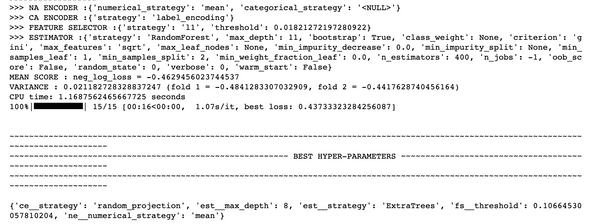
Let's now evaluate this model:
opt.evaluate(params, df)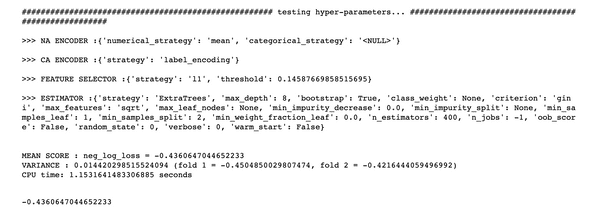
Running this pipeline resulted in a higher neg loss, which is better.
There's clearly very good potential of more improvement if we define a better space of search or stacking operations and maybe other feature selection techniques.
4 - Running predictions
Now we fit the optimal pipeline and predict on our test dataset.
More details here: https://mlbox.readthedocs.io/en/latest/features.html#mlbox.prediction.Predictor
prd = Predictor()
prd.fit_predict(params, df)
5 - Conclusion
Running an automated AutoML pipeline has never been easier. With MLBox, you can do this very quickly and efficiently so that you can focus on what really matters when solving a business problem.
- Understanding the problem
- Acquiring and consolidating the right data
- Formalizing the performance metrics to reach and compute
Let's hope these three first steps don't get automated soon :)
Hope you liked this library. Don't hesitate to star it on github or report an issue to its contributor.